Last week I talked about my frustration with booting kernels I had personally compiled for my Huawei U8150. Now that I have figured it out, I wanted to document the process so other people can follow along (and let the hoardes of Kenyan hackers take control of their devices!).
Tools…
Get (and unpack) these first and then we’ll talk!
- Android NDK (Required): Info and download
- ADB (Required): Info, Download
- Fastboot (Required): Info, Download
- Android SDK (Optional): Info and download
Setup (kidogo tu)…
To make sure your Linux user has permission to manipulate the device when we plug it in. udev is a daemon which runs in the background detecting devices and performing various tasks depending on certain hardware events. Create the following file with contents as shown below, then plug your IDEOS in, we’re almost ready to rock.
# Huawei IDEOS in bootloader mode
SUBSYSTEM=="usb", ATTR{idVendor}=="18d1", ATTR{idProduct}=="d00d", MODE="0666"
# Huawei IDEOS in adb mode
SUBSYSTEM=="usb", ATTR{idVendor}=="12d1", ATTR{idProduct}=="1038", MODE="0666"
And install a few packages into your Linux environment. If you’re on a Debian-based Linux distribution (like Ubuntu), the build-essential and git-core packages should suffice. Otherwise, you’ll have to search around to see which packages provide the GNU Compiler Collection (GCC), make, and git.
sudo apt-get install build-essential git-coreMay the source be with you…
Get a copy of the Linux kernel sources used in Huawei’s Froyo Android builds (~80-90 megabytes). As part of Huawei’s GPL obligation they are required to make public the changes to the Linux kernel. I’ve mirrored and tweaked them on my github account to make hacking and sharing easier:
git clone git://github.com/alanorth/kernel_huawei_u8150.git
cd kernel_huawei_u8150
Configure the kernel…
The Linux kernel has been around since 1991, and in that time a LOT has changed. There are thousands of configuration options possible, each of which represent support for dozens of different hardware platforms. Kernel configuration, while once a straight-forward task, is now a driven by a menu-based, quasi-graphical system, into which we can feed existing configuration files. For now we’ll just get a config from your device:
~/src/adb pull /proc/config.gz
gunzip config.gz
mv config U8150-Safaricom.config
Renaming the config to U8150-Safaricom.config isn’t necessary, but it’s a good idea to save a copy of the config with a meaningful name so you can reference it later. Now, make another copy for the kernel’s compilation utilities (by default it looks for a file in the current directory called .config):
cp U8150-Safaricom.config .configTwende kazi…
Now we move to building the kernel using the make command. Pay careful attention to the value of the CROSS_COMPILE variable below, as it points to the location where you unpacked the Android NDK (you did download it, right?). This variable tells the build process to “cross” compile the Linux kernel; that is, compile for an architecture other than the one we’re running on. Embedded devices like phones often run on ARM processors, while most desktop machines these days run on x86.
ARCH=arm CROSS_COMPILE=/home/aorth/src/android-ndk-r5b/toolchains/arm-eabi-4.4.0/prebuilt/linux-x86/bin/arm-eabi- makeCreate the boot image…
If your kernel compile was successful you can move on to creating a boot image. The boot image is comprised of two pieces: the kernel and the ramdisk. The ramdisk is a whole nother ball game, so I’ve included a default, unmodified one in the kernel source tree for you to use. Use the mkbootimg-U8150 tool to glue the kernel and ramdisk together (along with some other settings).
./release/mkbootfs release/boot.img-ramdisk | gzip > release/boot.img-ramdisk.gz
./release/mkbootimg-U8150 --cmdline 'mem=211M console=ttyMSM2,115200n8 androidboot.hardware=huawei console=ttyUSBCONSOLE0 \
androidboot.console=ttyUSBCONSOLE0' --kernel arch/arm/boot/zImage --ramdisk release/boot.img-ramdisk.gz -o release/boot.img
The output should be located in the release folder; just do a quick sanity check to make sure it’s not empty (or non existent). For example, mine shows a size of 2797568:
ls -l release/boot.img
-rw-r--r-- 1 aorth aorth 2797568 2011-06-29 00:30 release/boot.img
Flash the boot image…
Now you need to reboot your phone into bootloader mode. First, unplug it and power it off. Once the device is properly shut down, hold down the following keys: Power, Volume Down, and Red Key. The phone should vibrate, and then start up to the IDEOS screen. plug it back in, and wow you’re ready to flash…
~/src/fastboot flash boot release/boot.img
~/src/fastboot reboot
Well…?
Here’s what you should see if your phone boots up… if it doesn’t boot, leave a message in the comment and I’ll sort you out!
Notes…
Some questions, food for thought, things to write about later:
- How can we automate the build process?
- For reference, the Kenyan ROM I pulled my config from was V100R001C18B842
- The Kenyan ROM has multi-touch gesture support if your touchscreen hardware supports it, but the kernel generated by this compilation no longer does… why?
- If you’re having fun, why not fork my Huawei U8150 kernel repository on github? 🙂
Waaaaaay over my head but it looks great! Like the ‘Fork me’ banner!
Nice writeup Alan, followed your steps and managed to get the Kernel up and running. Will be checking now and then on your blog to pick your brain for U8150 🙂
Cheers.
Awesome, dude, that’s great to hear! I have some stuff in the works for sure… nothing revolutionary, but documentation about root, kernels, init scripts, etc. For fun (others can profit, but I’m only interested in the fun part ;)!
hey i have my ideos u8150 and i want to enable multitouch, a i followed a bit and managed to see that its synaptic. i also downloaded the files but the other part of the instructions i wasn’t able to clearly follow it up. so was wondering is it possible you clarify for me how to run those settings when i have rebooted?
Hey, jj, which part exactly were you lost at? Did you get all the tools unzipped somewhere, like in your Download folder?
hey pal.like your work.am still fresh in campus btw i have great intrests in programming.need your help.where do i start from especially programming an android os.like it’s kernel.the way you are doing.
Start by learning about Linux. Android’s kernel is Linux, just like Ubuntu or Debian or Fedora. This is systems development, not really programming. This type of stuff is more about kernel vs userland, boot environment, embedded systems, etc. If you’re not running Linux on your desktop, erase Windows and do it now. Also, start a blog to write about your experiences, it will help you refine your writing skills, as well as express what you learn (which is harder than you think).
yea alan i downloaded all of them. i even tried to to put my fon in reboot mode but then running that “~/src/fastboot flash boot noma_20110711v26_boot.img” has proved to be rather hard for me. i just cant seem to get how it is done
Hehe, you’re close. First, where did you download and unzip “fastboot” to? The “~/src/fastboot” is the location where
fastbootlives on MY computer (“~” is a shortcut for “home”, wherever that may be for your Linux user, such as: /home/aorth/). Second, which file are you trying to flash? If the file you downloaded isnoma_20110903v83_boot.img, then it doesn’t make much sense to flash the 20110711v26 one!Hey buddy..
I want to know how exactly i could upgrade my android 2.2 version on my ideos u8150 phone.
I rooted it with z4root and it worked well making the phone faster.
Hey, dude… first, define “upgrade” :). You can upgrade kernels, apps, “ROMs”… heheh. In this post I was showing how to compile custom kernels (the kernel is the part of the OS which sits in between the hardware and the applications, it’s an abstraction of sorts). Re read this post with that in mind, or check out my custom “noma” kernel here: Noma – experimental Froyo hotness. There are files you can flash directly to your phone in that message board.
If you just want to upgrade from Froyo (Android 2.2.x) to Gingerbread (2.3.x) you’re pretty much out of luck. Huawei hasn’t released Gingerbread for this device… but there’s a community-driven effort to port the AOSP Gingerbread sources to U8150 by way of CyanogenMod. See here for more information: http://forum.xda-developers.com/showthread.php?t=1001132
kali! kali !!!!!! cheki, thnx nyway, si now try adding support for loop devices on the kernel….jus wanted to run linux debian (ubuntu) on mine.. pliz reply if u can
Hmmm, loop device support. So you’d need both the kernel module as well as the userland utilities to manipulate them (losetup?), or is
mountenough?Alan, Excellent post which cleared many things for me (being very noob).
I followed the compilation path and found a (new) zImage in arch/arm/boot.
However running the adding the ramdisk step I received the following error:
error: could not load ramdisk ‘release/boot.img-ramdisk.cpio.gz’
There is no boot.img-ramdisk.cpio.gz in the git clone I made.
The command I ran is :
release/mkbootimg-U8150 –cmdline ‘mem=211M console=ttyMSM2,115200n8 androidboot.hardware=huawei console=ttyUSBCONSOLE0 androidboot.console=ttyUSBCONSOLE0’ –kernel arch/arm/boot/zImage –ramdisk release/boot.img-ramdisk.cpio.gz -o release/boot.img
Any idea what went wrong ?
Thanks
Awesome, glad you made it that far! You’re totally right, when I wrote this post everything was working, but then I updated my kernel repository to be MOAR AWESOME!!!1… and some stuff changed. Now the
releasefolder has an unzipped ramdisk, which you must zip manually! I’ve update the instructions to include that step. 🙂Alan thanks for the new instructions.
Now I received the boot.img and I’ll try to flash it later,
I do have a clarification request and question:
The command that is packing the ramdisk and Zimage to image.boot is using a RAM disk file that has a .cpio.gz suffix while the previous command does produce only a .gz file . – this needs to be clarified.
My questions : Does mkbootfs cpio the boot.img-ramdisk directory ?
and then does mkbootimg-U8150 cpio both zImage and boot.img-ramdisk.gz?
Thanks again for really excellent post.
iaracy
Hi Allan,
I have seen an article on how to use a serial port on G1 phone, i need to have a kernel with the Linux serial drivers enabled on Huawei U8150 to do the same. I want to use the google serial port API (http://code.google.com/p/android-serialport-api/) to make an app for communicating with my micro-controller custom hardware board. I already have the micro-controller board communicating both ways with a PC and made the serial cable for the phone, such that the phone can even charge from my custom board.
There is an instructible: http://www.instructables.com/id/Android-G1-Serial-To-Arduino/
I picked this up: http://www.instructables.com/id/Android-G1-Serial-To-Arduino/#commentactioncontainer_CVW387FG7DYJ9OQ
I installed the gingerman v7 rom on the ideos but the google api isnt working, cant open the port. how do i compile a kernel so that it has the native serial drivers enabled?
from the phones terminal, i can see the ttyMSM2 entry in /dev and had done chmod 777 /dev/ttyMSM2. any help or comment will be highly appreciated.
Hey, that sounds pretty cool. I’m actually not sure what you’d need to enable. So you want to read/write to a serial port from your app. This would be serial over USB, yeah?
yeah, Serial over USB.
Check the last two comments at this page http://www.instructables.com/id/Android-G1-Serial-Cable/
The comments suggest that some configurations should be enabled/disabled for the app to access(rw) the port through the system/kernel:
CONFIG_HTC_HEADSET
CONFIG_MSM_SERIAL_DEBUGGER
CONFIG_MSM_SERIAL_DEBUGGER_CONSOLE
& also:
CONFIG_MSM_FIQ_SUPPORT
probably set to “=y” or “=n” for yes or no……
Good news and bad news, those kernel config options are in the kernel, but don’t compile. Hmmm…
CC drivers/serial/msm_serial_debugger.odrivers/serial/msm_serial_debugger.c: In function 'dump_irqs':
drivers/serial/msm_serial_debugger.c:214:28: error: 'struct kernel_stat' has no member named 'irqs'
drivers/serial/msm_serial_debugger.c:216:3: error: 'struct kernel_stat' has no member named 'irqs'
drivers/serial/msm_serial_debugger.c:216:3: error: 'struct kernel_stat' has no member named 'irqs'
drivers/serial/msm_serial_debugger.c:221:30: error: 'struct kernel_stat' has no member named 'irqs'
make[2]: *** [drivers/serial/msm_serial_debugger.o] Error 1
make[1]: *** [drivers/serial] Error 2
make[1]: *** Waiting for unfinished jobs....
I’ll try to debug later when I get some more time. Have you tried compiling the kernel? I could help you if you’re not sure how?
First i would like to say thanks a lot man, you’re the first one to give me some hope in this.
dump_irqs could be a function written for dumping the kernel status if hardware fails, seems like it tries to extract interrupts info from the kernel but from a struct entry that doesnt exist…could be the interrupt entry is a different name in the kernel… am not an expert in linux.
anyway, am actually not sure how to compile the kernel, will need all the help i can get, even if its just a link to some of your already existing guides. If it takes long to copy the sources its fine, i can leave my machine on, i got stable unlimited internet at home.
Again, thanks.
i figured out that on cloning the source, the line
git clone git://github.com/alanorth/kernel_huawei_u8150.git
had to change to:
git clone http://github.com/alanorth/kernel_huawei_u8150.git
after exporting proxy environmental variables since i am working behind a proxy server.
i checked and in the file kernel_huawei_u8150/include/linux/kernel_stat.h there’s this code for the struct in question:
struct kernel_stat {
struct cpu_usage_stat cpustat;
#ifndef CONFIG_GENERIC_HARDIRQS
unsigned int irqs[NR_IRQS];
#endif
unsigned int softirqs[NR_SOFTIRQS];
};
so is the error misleading?
i commented out the for loop making use of this struct in the “drivers/serial/msm_serial_debuger.c” file and it compiled successfully.
i don’t think that’d be a good idea…seems like we need to move kstat_irqs array to irq_desc struct. saw that here:
http://git.ncl.cs.columbia.edu/git/?p=linux-android-msm.git;a=commit;h=dee4102a9a5882b4f7d5cc165ba29e8cc63cf92e
On another note, i had already flashed to clockwork recovery, i have dronix on my Huawei U8150. how do i flash the boot.img? in clockwork recovery mode, i can only install a zip from sd, right? tried fastboot but says ‘waiting for device’ even though my device is connected and in recovery mode. Looking forward to some advice.
Ujanja wangu umefika hapo msee…
Hmmm, yeah, cloning over HTTP might be more reliable for a lot of people. I guess
git://TCP 9418, which is most definitely not open in most whitelist-style firewalls. Glad you got it cloned, though.About the code… wow, that commit is a good find. Having a second look at it I noticed that the
kernel_statstruct only definesirqifCONFIG_GENERIC_HARDIRQSis set. I checked the kernel config (search with “/” inARCH=arm menuconfig) and that config option doesn’t even exist so I just changedinclude/linux/kernel_stat.hto read:It compiles and boots on my U8150 running a CM7 nightly build, but I don’t know how to use it, so give it a try and let me know!
Regarding fastboot, you might need to add some permissions to
/etc/udev/rules.d/60-android.rules(or similar) so your user has write permission to the device node. Try fastboot as root and if that works then that’s your problem.Hey, progress, was able to restore to safaricom stockrom, cant get the phone into bootloader mode, exactly what am i supposed to see on the screen at this point:
“Once the device is properly shut down, hold down the following keys: Power, Volume Down, and Red Key. The phone should vibrate, and then start up to the IDEOS screen. plug it back in, and wow you’re ready to flash…”
i get the IDEOS wording on the screen but “fastboot devices” lists null. i was able to use adb commands so this is nothing to do with udev rules-fixed ’em. the phone was rooted using z4root
The device has different product IDs when in different USB modes. Check to make sure you have proper udev rules for the device when it’s in fastboot mode (
lsusb | grep Huawei)!Or… try as root. :(!
different product id’s thank you….Bingo!!! Root never worked, was making one blander still,i rectified it by placing fastboot binary in the /tools folder of the sdk and worked just like adb, managed to boot my custom kernel at last., feels very nice. am proud of you. i have actually learnt a lot in the process, but there’s a lot to learn on kernel compile options like schedulers and stuff. Am now working on the android app, will let you know if it works.
Awesome, dude. That’s why I write this stuff on the Internet after I learn it… hehe. Keep me posted on your app, I’m curious about the serial stuff…
Thanks for this great post, Alan, it helps a lot for me also trying to compile the kernel for C8650 for me. A question is that where did you originally find the kernel source of Huawei? Thanks!
Glad it helped, Ryan. The source for the kernel comes from Huawei’s open-source release center (as part of the requirements of the GPL)… last time I looked the source link didn’t work any more. 🙁
Hi mjanja.
seeems like my joy was short lived, but i found a patch “morfes-kernel_ideos_usb_host” on github. it has everything : the patch for the input devices. Very stable now. Am too busy at work and studies to make a post. hope someone will be able to use this source. I should mention, the ADB mode is not available in the usb_host kernel and you cannot mount the sdcard by simply plugging into another usb host PC(makes sense). You actually need an externally powered usb bus coz the phone cannot power the bus. I got a dual usb connector off an old PC motherboard in the lab, yap, that worked for me. My blog will be up in two days, will post there. karibe.co.ke
Here’s the github link:
https://github.com/morfes/kernel_ideos_usb_host
Ah, yes, I’m familiar with that patch; Sven ported it to U8150 after stumbling upon my blog post about compiling kernels, https://mjanja.ch/2011/06/let-the-games-begin/#comment-17. I haven’t had any use for it, so I haven’t tried it. I’d be really interested in knowing what kind of creative uses people are putting this to. I’ll keep an eye on your blog. No pressure 😉
How would one go about increasing overclock frequencies? I have a kernel my brother gave me to work on and he wants me to increase his overclock frequency, because he noticed that in the acpu-clock-7×30.c that it looks as though it would possibly get up to 804000khz.
I downloaded the kernel for U8818 from the link https://github.com/ivan19871002/android_kernel_huawei_u8818/tree/ics but unable to build the kernel.I got config via adb pull command and placed it in directory named .cofig.when compile the code it prompts me to set values for several kernel configuration parameters.
Please help me where am I missing?
If it asks you to set values it’s because there are kernel config options in your kernel source which AREN’T in your .config. If your device is based on a different major version of the kernel source then these can be quite many (2.6.32 -> 2.6.33) is a major version increase.
What device are you using, and what kernel is it running?
I’m definitely going to do this now.
Challenge accepted.
One question though:
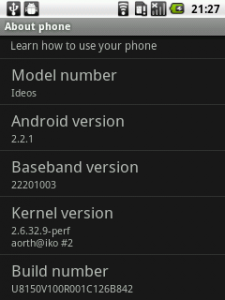
How do you get to brand the kernel, i.e in your case, aorth@iko?
I’d assume the build system uses the combination of your username and hostname as username@hostname but….I have been wrong before.
You’re right. My system at that time was called “iko” hahah. The kernel build scripts grab the username and host who built it. 🙂
I just got back at compiling a kernel for u8150 after a while, am stuck somewhere am not supposed to be…am not sure whats supposed to happen after I run the command
./release/mkbootimg-U8150 –cmdline ‘mem=211M console=ttyMSM2,115200n8 androidboot.hardware=huawei console=ttyUSBCONSOLE0 androidboot
but the terminal sits there like its waiting for input..
I guess nime-rust tu sana after physics exams, please help me out kiasi.
Thanks for the guide.
I successfully compiled the kernel for Huawei U8818 device.
I also added the new product directory tree for Huawei.
I successfully compiled the source code using make -j4 command.
But when I use command make -j4 otapackage to make an ota package.It gives me an error “NO recovery.fstab found For the TARGET DEVICE”.
How to solve this issue.
Please help I am googling for almost 15 days but no significant help.
Looking forward to here from You.
Hmm, is the “no recovery.fstab” error fatal (ie, does the build continue)? Just give it a recovery.fstab from a stock ROM. Hell, you could probably just create a blank file in your device tree just to make the build system happy!
Hi there, AWESOME WORK!!.Really great.
I have a u8150 running ICSIdeos2 which seems to be based on CM7 for ideos. So im into customizing things and and i’ve really perspnalized alot of this rom save for one thing “initlogo.rle”- the bootlogo inside boot.img
Everytime i try to use my own custom logo, i repack the boot image succesfully and phone boots up but consequently i lose all my radio functions (wifi, phone bluetooth etc)
What could be the problem?
Could you have a solution.
Thank’s alot
Dunno. Sorry. Check the logcat or dmesg after the problem happens…?
Hi ,
That sounds like music in my ears !I have tried to Flash ICS on mine with countless failure .What is the location of the ROM you used?
Hello Alan,
Used the same instructions (slightly modified) to compile a custom kernel for a ZTE Blade and a Huawei U8150.
Notes for these who get stuck:
1. You must create an udev rule for your device before you can flash it. Alan has explained it all above.(And in a post in reply to Karibe)
2. The adb and fastboot programs are 32-bit ELF binaries:
Running file ~/bin/adb (Where I downloaded ADB) returns:
/home/lin/bin/adb: ELF 32-bit LSB executable, Intel 80386, version 1 (SYSV), dynamically linked (uses shared libs), for GNU/Linux 2.6.8, not stripped
Same applies to fastboot:
/home/lin/bin/fastboot: ELF 32-bit LSB executable, Intel 80386, version 1 (SYSV), dynamically linked (uses shared libs), for GNU/Linux 2.2.0, not stripped
This implies that if you’re on a 64-bit Linux, you’ll need to install the 32-bit multiarch libraries (ia32-libs on Ubuntu) BEFORE you can execute these programs.
Happy hacking, dudes.
Back to lulz.
Cheers,
Dennis
Can’t bliv i had to do this all over again to return the phone from usb host mode in order to sell it :D, old is gold, great source and guide!!!
Hi Mjanja,
Happened to format system,boot and recovery and later tried to restore an old backup using an updated version of cwm and failed!Now its frozen on ideos screen and it cant load.Ive successfully istalled ultrajack though.I still have the old clockworkmod backup files.Is it possible to use ultrajack to install a newer Rom ( where can I download them?)or Restore the old backup? Kindly help bana nimesota.
hi Allan! I have huawei ideos u8150 but the problems are that;
1. I can’t access my SD card via a PC coz it keeps displaying “USB device not recognized” whenever I connect.
2. A number of times trying to send messages they keep bouncing back.
3. When on a voice call the recipient can’t hear me clearly (voice so low even if I shout). could this be a hardware problem?
4. I do have sudden end of calls when on air.
I’ll appreciate assistance on these pliz!