The source code for Android 4.0 “Ice Cream Sandwich” was released last week, and Google’s build instructions list Ubuntu 10.04 as the only officially “supported” configuration for building
Ubuntu 11.10 in particular is troublesome because it uses gcc-4.6 by default and has no sun-java6-jdk in its repositories. Here’s what you’ll need to do to get AOSP 4.0.x to compile on Ubuntu 11.10.
Install dependencies
Compilers, parsers, file-manipulation tools, libraries, etc; this is mandatory! The list on the source.android.com Inititalizing a Build Environment page is similar, but a few of those packages don’t exist in 11.10. Use these:
$ sudo apt-get update
$ sudo apt-get install git-core gnupg flex bison gperf build-essential zip curl zlib1g-dev libc6-dev lib32ncurses5-dev ia32-libs \
x11proto-core-dev libx11-dev lib32z1-dev libgl1-mesa-dev g++-multilib mingw32 tofrodos python-markdown libxml2-utils
Install an “old” GCC
In addition to building applications for the phone, Android’s build system builds a few tools for the host operating system (such as the tools in the SDK). The initial release of the Ice Cream Sandwich source code has a few incompatibilities with the version of the GNU C compiler which comes with Ubuntu 11.10 (GCC 4.6). Install GCC 4.4 from Ubuntu’s repositories:
$ sudo apt-get install gcc-4.4 g++-4.4 g++-4.4-multilib gcc-4.4-multilibSmall fix for libX11, which some statically-linked programs might need:
$ sudo ln -s /usr/lib/i386-linux-gnu/libX11.so.6 /usr/lib/i386-linux-gnu/libX11.soDownload Sun Java 6 JDK
Android 2.3+ requires Java 6 to build correctly. While OpenJDK did work for 2.3, it doesn’t work for Android 4.0; you need Sun Java. Download the JDK 1.6 binary release from Sun’s Java download site and unzip it somewhere in your system, for example:
$ sudo mkdir -p /opt/java/64/
$ sudo cp jdk-6u29-linux-x64.bin /opt/java/64
$ sudo su -
$ cd /opt/java/64
$ chmod +x jdk-6u29-linux-x64.bin
$ ./jdk-6u29-linux-x64.bin
$ exit
Add the new Java to your shell environment’s $PATH so it takes precedent over other Javas you might have installed:
$ echo 'export PATH=/opt/java/64/jdk1.6.0_29/bin:$PATH' >> ~/.bashrcRelaunch your terminal and test, java -version:
$ java version "1.6.0_29"
Java(TM) SE Runtime Environment (build 1.6.0_29-b11)
Java HotSpot(TM) 64-Bit Server VM (build 20.4-b02, mixed mode)
Building…
Follow Google’s Downloading the Source Tree, which will help you install the repo tool and clone the android-4.0.1_r1 branch. It’s damn near 9 gigabytes, so make sure you have a fast Internet pipe and a pot of coffee ready.
After that you’ll be ready to build:
$ cd ~/android/ics
$ lunch full-eng
$ make CC=gcc-4.4 CXX=g++-4.4 -j4
On my dual-core Core i7 Thinkpad T420 with 8GB of RAM this takes ~110 minutes, your mileage may vary depending on the number of available cores, amount of RAM, and speed of your hard drive(s).
If your build completes successfully you’ll be able to test it immediately using the emulator command (a version of QEMU, built as part of the build process):
Excellent tutorial, thanks for posting. Any chance you will follow up with how to set up the vendor files for non-dev phones?
I am trying to finish up another Android port already (but on CyanogenMod). Once I get that port more stable I’ll start looking into setting up new devices on AOSP. I’ve got a Samsung Galaxy S, which should run Ice Cream Sandwich pretty well. There’s already an initial port for it, but I might look into helping them (if I have anything to offer, hah).
If you’re interested, I did learn a bit about vendorsetup scripts and lunch combos, and I wrote about that here: https://mjanja.ch/2011/09/building-cyanogenmod-7-for-the-huawei-u8150/
I just successfully compiled and run the emulator. Now I am trying to port this to a device. Is there an AOSP port guide available or the CM will work. I am looking to port AOSP to the Nexus S and the Samsung Galaxy S 4G devices. I would like to learn from AOSP before using CyanogenMod.
While building ICS4 on Ubuntu 11.10 on 32 bit JDK, I get the following error while compiling..
chost Executable: bb_dump (out/host/linux-x86/obj/EXECUTABLES/bb_dump_intermediates/bb_dump)
/usr/bin/ld: cannot find -lncurses
collect2: ld returned 1 exit status
make: *** [out/host/linux-x86/obj/EXECUTABLES/adb_intermediates/adb] Error 1
make: *** Waiting for unfinished jobs….
Looks like you need the ncurses libraries installed on your system. Are you sure you installed all the relevant package dependencies? Also, I think 32 bit isn’t fully supported by Google… so it might not even work!
So are you saying I need to be running the 64-bit version of Ubuntu to build ICS? If so, any known issues doing that within VirtualBox as long as the host system is 64-bit? Thanks!
I haven’t tried on 32 bit, and sure enough, Google’s official documentation says 32 bit support is “experimental”, http://source.android.com/source/initializing.html. If your VirtualBox host is 64 bit, then you should really be creating 64-bit guests as well… there’s no reason not to. 🙂
Thank you for this very helpful article!
FYI, to make it compile without error I also needed to do:
sudo apt-get install g++-4.4-multilib gcc-4.4-multilib
Ah, thanks. I might have already had those installed, so I didn’t notice they were required. I’ll add them to the list. Cheers!
After following your guide, I’ve this error :
build/core/base_rules.mk:166: *** abi/cpp: MODULE.TARGET.SHARED_LIBRARIES.libgabi++ already defined by Custom_android/abi/cpp. Arrêt.
Do you know how to fix it ?
I’m on kubuntu 11.10
Nope, not sure. Never seen that. Are you sure you’re using the proper GCC?
make CC=gcc-4.4 CXX=g++-4.4?Java install is not easy as versions are changed to release 7u1
I’m not sure what you mean. Did you have problems installing Java 1.6? Java 7 isn’t supported for compiling AOSP…
When I went to Oracle website the latest version 7u1 was pushed for download. I installed that and when I pulled the android source down it wouldn’t’ compile due to it not being compatible with new Java. I tried to force the compile by getting the code to jump over the version check but it still faltered.
I read after some research that the Android code is not suited for 7u1 yet but will soon be, so I’ve decided to leave it till then.
The instructions on downloading the Java 6 JDK did not work for me on 11.10 64 bit. It did not appear to be in the path. I tested this by running:
I used these commands instead and that appears to have worked:
Other than that, great tutorial. I am building at the moment.
I initially started building in Mac OS X Lion but after several issues with Lion, I decided to use Linux via VMWare Fusion instead.
Thanks for your tutorial Alan!
Glad you figured it out. The PPA is definitely much easier for installing Java, I just wanted to do it the “hard” way. 😉 I’m sure someone will find that useful, though.
I’ve given up as I don’t want to downgrade JAVA. It’s pretty slack that Google can’t keep upto date for their code to suit the base engine.
You don’t have to downgrade Java… just install it along side your other one. You can use both, just make sure to set the PATH to include the Java 1.6 before you mess with AOSP. 🙂
Oh ok, have 6 as a slave install. May try soon.
Another point is I only installed Java as the one I original started with on my system was Ubuntu repository version, which also wasn’t compatible with the Android build. I need to get some in between version that would have required digging into legacy releases at oracle. Mind you I didn’t know this till the latest failing.
for this line if I wanted to make a otapackage
would I change it to this?
Yeah, that should work. 🙂
ok another noob question.
if I had a recovery.img from say cwm can I have this pre-built recovery.img added to my otapackage during the build instead of adding the default android recovery?
I know that one could mount the image and replace the android recovery image every time a build is completed but I was hoping for a more native way.
I think you could probably just replace the boot or recovery images in
out/target/product/..before youmake otapackage. I do it with CyanogenMod sometimes, but never tried in AOSP.Thank you.
I am actually using this guide with the cyanogenmod ics branch for my wingray xoom. so far so good. I have compiled a working version using this guide and the binaries from google. http://code.google.com/android/nexus/drivers.html#wingray
After I determined that they removed get-rommanager.sh from the ics branch and I manually downloaded the script from https://github.com/CyanogenMod/android_vendor_cyanogen/blob/gingerbread/get-rommanager it worked great.
I am using this guide and Building CyanogenMod 7 for the Huawei U8150 https://mjanja.ch/2011/09/building-cyanogenmod-7-for-the-huawei-u8150/
I just did a repo sync for cyanogenmod ics branch and someone else already did the work I wanted to do for the wingray xoom and pushed it through the cyanogenmod github.
🙂 I guess all I have to do now is recompile.
Thanks again!
OK, now that I have finally completed the exercise, a few suggestions for your consideration:
1) I would emphasize the need to install Ubuntu 64-bit at the start. The Ubuntu download page and many of the online guides recommend using the 32-bit version for compatibility, and so I got a fair bit into this before seeing the need to be 64-bit.
2) A couple things were “off” on the Java instructions. First of all, if you follow your link, it takes you to the 7 branch. So you might want to point out to folks that they can click on the box on the right for “Previous Versions”, and then get the 1.6.9 029 version that both Android and your instructions prefer. Second, the given statement to add to the .profile doesn’t create a working PATH fix (at least for my setup of 11.10). I had to edit the .profile instead to add a line:
PATH=”/opt/java/64/jdk1.6.0_29/bin:$PATH”
3) Once you’ve completed the build instructions, you should point out the need to run that “. build/envsetup.sh” first. Then both you and the Google site use the lunch tool for the example. However lunch is not installed by default. Fortunately Ubuntu gives you the apt-get line for lunch-python, but it might be helpful to add it.
FWIW, after all this I did get a successful build of ICS to run in my emulator. Now to start working to customize for my 7 inch tablet 🙂
Congrats! Thanks for the feedback. You’re absolutely right, I missed the
. build/envsetup.shstep, I’ll add it right now.Regarding the
lunchcommand, it’s actually a shell function which gets created by the build setup script. If you’re curious, explore the output oftype -a lunch. Thatpython-lunchpackage you mentioned is something unrelated.Regarding the
PATH“fix” for Java, I’m not sure what went wrong for you. Make sure your~/.profileactually has the modified PATH in it, and is exported at the end of the profile before it gets overwritten.Regarding Java 1.6… I mentioned several times that you needed 1.6, but maybe I should include a note that I really mean it; 1.7 won’t work!
excellent tips!
thank you very much for these instructions on ubuntu 11.
🙂
ventanas
Hi,
are you able to get apt-get working fine under ubuntu 11.10 behind a proxy with NTLM authentication?
I’ve been spending two days trying to get it working but nothing seems to work.
I have proxy_ip, proxy_port, proxy_user_name and proxy_password to setup, I have tried putting them all in the /etc/bash.bashrc file using the HTTP_PROXY environment variable, but it doesn’t work.
any suggestion?
🙂
M
Hi, i am trying to download the source code for ICS but when i try to init my repo gives error…
repo init -u git://github.com/CyanogenMod/android.git -b ics
fatal: Cannot get https://android.googlesource.com/tools/repo/clone.bundle
fatal: error unknown url type: https
user@localhost:~/Android/ics$
someone please help me…i am trying hard reading every q&a but couldn’t get it through…
You’re trying to checkout CyanogenMod, not Google’s ICS (a small difference, but worth noting). Regarding the https error, which version of git are you using? What about repo? Maybe try updating to the latest repo (from Google’s AOSP build instructions):
Hello,
On my Intel Core i3 370M powered laptop, the build process took 198 minutes.
Question is, how do I install this on an Android powered device or phone?
And how do I run this in Qemu?
Thanks in advance.
Make sure you have ccache installed, it will help cut down the build time on successive builds! Also, make sure you have hyper threading turned on, this can help greatly. For the record, I can build CyanogenMod 9 (ICS) in 10-15 minutes on my build server (Core i7-2600, 16 GB RAM).
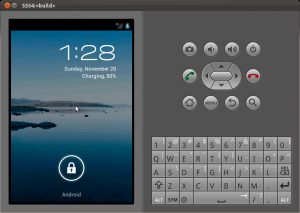
btw, the Android build system compiles qemu and adds it to your shell’s $PATH. Just run
emulatorafter a successful build (see my screenshot in the post, this is what I did)!Hey Alan,
Where’s the screenshot?
You’re kidding, right? It’s at the bottom of the post… unless you’re talking about something else? That’s a screenshot of Ice Cream Sandwich booted in the emulator.
I did the build in an Ubuntu 11.10 x64 virtual machine with 4 CPUs, Intel VT-x and Intel EPT(Extended Page Tables) extensions enabled and 6GB of RAM.
So far, so good. Yet to figure out how to install it on an Android phone.
Hehe, you can’t just install it to a phone. Android is only one part of the OS; there are other device-specific libraries (camera, radio/modem, sensors, etc), and not to mention a working kernel, which are required to actually RUN Android on a device. Google gives you AOSP (Android Open Source Project), but that’s only the beginning.
If you really want to install Android on a device you have to do lots of work! Look into the CyanogenMod project, they modify AOSP so it can be run on many other devices. Maybe some hacker around the world has already started on your device… 🙂
Hi orth,
You had given nice tutorial for building.Following your tutorial I successfully compiled the android ICS source code.
Now I want to build the custom ROM for the Device.While googling I found the following.
1) I need to compile kernel for a specific Device.
2)_I need additional binaries(i.e Hardware Drivers).
To build the custom ROM.
My target devices are from ZTE,Huawei,Samsung and Htc
Can you suggest me some generic tutorial by following it I can build Custom ROM for all the devices.
One More doubt is from where do I get the kernel source code and
binaries(Hardware Drivers).
Please Help Me in this regards.
Waiting for Your Valuable Reply.
Hi,
I can’t figure out why the instructions from http://source.android.com/source/initializing.html
causes so many errors. I feel I’m nearly there since I’m able to
start the emulator. However, it get stuck on the blinking android
logo screen. Even after letting it run all night, the logo is still
there. So I decided to use “adb logcat” command while initiating the
emulator, and realized it is on an endless loop.
Now I am wondering, if you download the android-4.0.1_r1 repository,
does the emulator ~automatically~ start up ICS? From the instructions it
just say run the emulator, but apparently its not that simple.
Is there supposed to be any additional steps to run ICS on the
emulator other than the instructions from the AOSP website?
here is my environment:
Host OS-> MacOS 10.7.4 (OSX Lion) x86_64
VirtualBox 4.1.18
VM’s OS-> Ubuntu 10.04 amd 64bit
java version “1.6.0_21”
AOSP Build Tag-> android-4.0.1_r1
Build Target -> lunch full-eng
I also used adb commands for debug
adb bugreport -> http://pastebin.com/4Xp8VLYn
adb logcat -> http://pastebin.com/ry9cVhn5
Good tutorial, thanks for contributing.